FROM ROB'S BENCH
Almost perfect

Rob Brown

Blog for March 19, 2026
In between working in the shop and editing a few articles for the upcoming issue, I've been spending a lot of time with paper and scissors, trying to wrap my mind around a layout for my future backyard workshop.
When you move your tools into an existing building, you just do the best you can with the space you have. But when you’re designing a new building, you really want to stack the deck in your favour.
Even with careful planning, there will likely be a few things I will wish I had done differently once I get into the space and start working, but I’m trying to minimize that from happening as best I can. My new workshop doesn’t have to be perfect, but I want to design a space that works for me, my tools and the sorts of things I build as much as possible.
This space will be used professionally. If you’ve read my weekly columns over the past few years, you’ll know I make everything from tiny buttons for my wife’s crochet projects up to custom kitchen cabinets and large wall units. The larger projects are essentially what I’m designing my workshop around. I’m quite sure a nice little side table will go through this workshop without any troubles at all, though a wall unit, set of kitchen cabinets or a 14′ long boardroom table may be a different story, and these have to be carefully planned for. I don’t want this space to slow me down, especially if I can avoid that with a bit of planning. This is why I’ve spent a decent amount of time pushing paper machinery and storage cabinet cutouts around my kitchen table over the past week.
Where should I start?
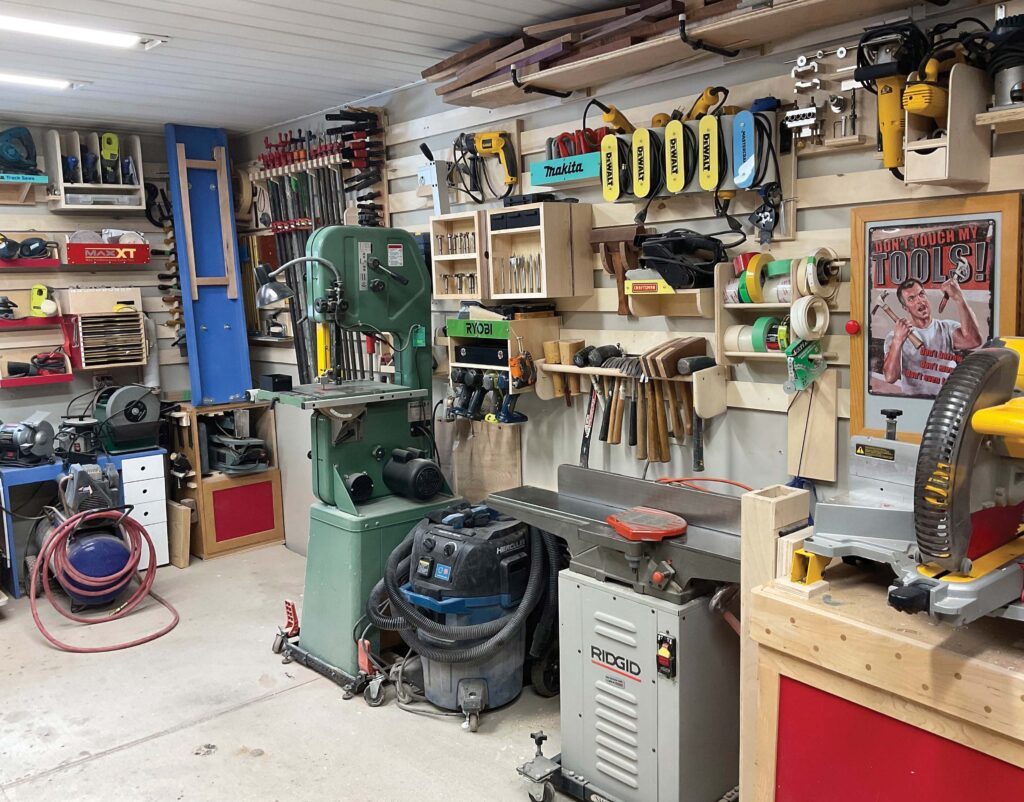
I started with the table saw, as it’s not only the largest piece of machinery, but also the most used. On top of that, it’s the least movable machine I have. It also needs the most free space around it. I need at least 8′ in front of and behind the blade to cut a standard 4’x8′ sheet, as well as 4′ to the left side of the blade to rip that sheet. In a perfect world, I’d have more like 10′ of room in front of and behind the blade to rip some long lengths of solid wood.
I currently have the table saw directly in front of the large garage door, just in case I need to open the door to gain any extra outfeed space. I also decided to run the saw along the longest wall, with the saw a bit closer to the garage door, to maximize the area on the infeed side of the saw. I figure I’ll be able to rip a 12′ board without having to adjust anything, other than make sure the garage door is open.
What's next?
My dust collector, thickness planer (which is on a cart with wheels) and drill press immediately fell in place next. The dust collector fits next to my hinged outfeed table perfectly and the planer can sit right next to it. I’ll typically hook up my dust collector to my planer during use, so it makes sense to have them near each other. With about 24″ remaining, I slid my drill press into place at the end of that wall.
The jointer was next. Since it also operates on 220V, like my table saw, both of these workshop workhorses can both share the same plug, and means they’ll have to live close together. For the past five years I’ve had my jointer in the infeed area of my table saw, pressed against the wall, which has worked out fairly well. I may end up pulling my table saw an extra 6″ away from the wall, compared to how it’s located in my current shop, just to give me a bit more space for my jointer. Not to get too ahead of myself here, but it turns out I will have a medium amount of space in the centre of the shop, so losing 6″ of it shouldn’t be a problem.
The remaining 2′ of wall space on that side of the shop will house a sheet good storage rack. It will protrude 4′ towards the centre of the shop. Last but not least, my scroll saw will tuck into a perfect little spot in the negative space my awkwardly shaped jointer left behind. A few different upper cabinets will be located along this wall as well, providing storage for all sorts of power tools and accessories.
Now what?
That all took me about five minutes to lay out. The next steps happened over the following three days, in about 15 different sessions. I will admit, very few changes were made, but a lot of head scratching happened. None of the original wall changed, but the rest of the layout gave me trouble.
I started part two of my shop layout with my workbench. In many ways, it’s similar to the table saw in that it’s large, gets used often, needs to have ample open space around three sides of it (well, two sides, at minimum) and is too heavy to move around on a whim. I can’t possibly remember where I first placed it, or how many moves that paper workbench made, but it’s now a well-travelled piece of paper.
It spent time on each of the three remaining walls. Each time, I moved the remaining fixtures (mitre saw, clamps, tool chest, more clamps, disc sander, even more clamps, a wide storage cabinet, the last group of clamps and a hand tool cabinet) into place around it. Something didn’t feel right about each new position I tried. It would look fine on paper, but when I imagined being in the space, making a piece of furniture, it didn’t flow wonderfully.
Making matters worse was considering where the windows would go. In certain locations, they simply got in the way, but I definitely needed to have them in the overall shop layout.
Remove what isn't working
Things were a bit too tight. I’d wrestle with a few layouts, then take a break for a few hours, only to return and do a bit more wrestling. It was unproductive and frustrating, not unlike designing most of the furniture I’ve ever worked on, to be honest. In many furniture design scenarios perfecting the design comes down to removing what isn’t working, rather than adding something else in, and that’s what eventually happened here. The large storage cabinet that sits on the floor just had to go. I was really hoping to be able to use it on the main level of the shop, not only for storage, but for some smaller assembly tasks, since it has a hinged surface that can fold out and double the surface area it can support. No dice. Upstairs it went.
At this point, things fell into place fairly quickly. The workbench will be on the rear wall of the shop, while the hand tools will be on the wall, close by. The mitre saw and drill storage rack will not be too far away, while the bandsaw and the main clamp storage area will be on the front wall. The area for the bandsaw is tight, as it’s right beside the door – almost in the way of the door – but that’s where it will sit for now. Clamps will also be stored in a number of other miscellaneous areas around the shop, depending on their length, type and how often they’re used.
Almost there
I’m sure this layout will get adjusted over the coming weeks and months. I’m sure the layout will also change once the machines and other fixtures get put in place. There’s always a bit of a learning curve with a new shop, figuring out how workflow moves through the shop and what needs to be changed. I think the first large sheet good project will be a great test for this new space. I’m looking forward to it already. But first, I have to take another look at that bandsaw location and see if it can be improved.
Final Layout?
This is the result of many hours of drawing, cutting, shuffling, adjusting and imagining. A somewhat large area in the middle of the space will allow for work-in-progress and any potential short-term machinery storage that comes about.


I really enjoyed this article; well thought out IMO. What are the dimensions of your new shop?
Hi Paul,
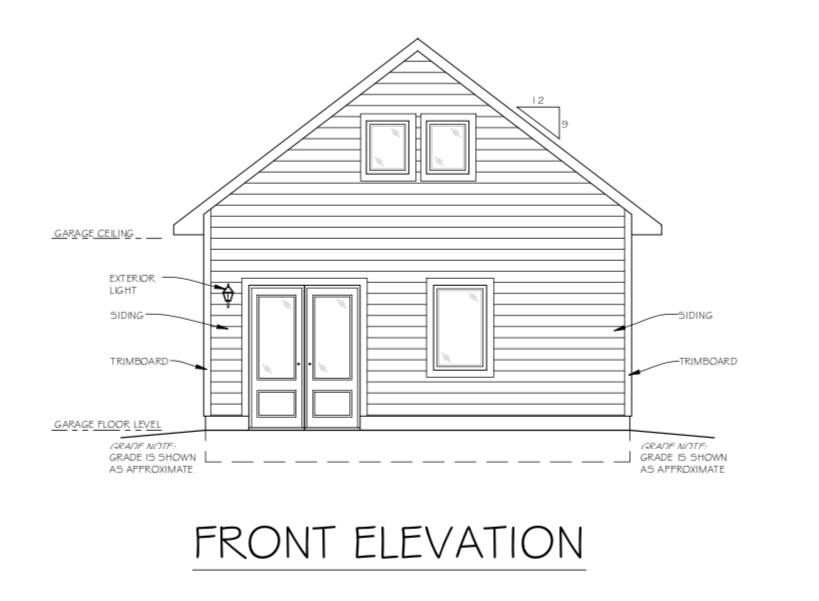
I’m glad you enjoyed the article. This is certainly a work-in-progress, and I’m sure it will get adjusted as things move forward. The footprint is 20×22, which is as large as I can make it, without a substantial output of money and time. Living in a City has its perks, but one downside is smaller outbuildings.